How to develop photos?
If we had enough luck and good weather conditions the photo already nice but I'm sure it is also contains a lot of possibilities.
I've mentioned RAW format already, several times. This is really important to get the best results. I'm using Adobe Lightroom to develop my images but I'll try to give some general hints so it will be possible to use it in all other RAW software too including the program may came with the camera.
Before we start make sure your monitor is calibrated. This is important because if you fine-tune your photo on a too dark/bright monitor or with bad colors the results will be bad on paper or on other computers. The cheapest way is using a test image (click here for a test image) or to use some software based solutions. For Apple computers you can do this with the integrated feature in system preferences. Of course this is not a perfect solution but it can be enough for most cases. The best way is a hardware calibration device (Pantone huey, Datacolor Spyder, Eye-One..etc).

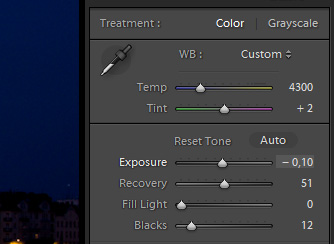
So when you finished with the test screens go and load the image file into your favorite RAW processor or image editor. The most important are the image brightness and white balance settings. For the best results fine tune the exposure correction until the sky turns into the desired dark blue color. If you feel that you need to apply more than 1.5 EV (+1.50/-1.50) in any directions then there is a good chance that you will over process your photo and this will result in a lower quality like increased image noise, burned in city lights, bad colors. You can fix this problem by adjusting exposure correction on your camera next time when you taking blue hour photo.
After you finished with the image brightness tuning and the sky looks good enough it is time to play with white balance. For the good results it should be around 4000-4800K. If you want to increase the blue colors in your photo try to reduce the color temperature but don't forget to always watch the other areas of the photo for colors and light sources to avoid bad and unreal colors.
If you have JPG file then look for Levels or Curves setting in your photo editing software. You can fine tune the brightness of your image by lowering the brightness of the dark colors. On the screenshot below you can see the Levels setting for a blue hour photo. The left part of the histogram represents the dark colors of the image. For a blue hour and a night photo it is normal to have a graph like this. I've marked this area with red and you can darken your image by moving the small black button to the right. Also if you find the bright colors (like city lights) too dark on your image you should try to adjust the other side of the graph by moving the button – marked with green to the right. Just make sure to make minor adjustments to avoid increased noise and too bright (white) spots. On the other screenshot below you can see the Curves options. This works similar as the levels but you have to adjust a straight diagonal line into a curve to modify the image parameters. Put an anchor point on the lower left part of the line and move it down carefully to get a darker image and put an another anchor point close to the center of the line and move it up to increase the bright parts of the photo. With these tools you can achieve a really good, dramatic photo.
nike air max 90 blue


